Welcome User!
This Pixel Forge turns a custom black-and-white waveform image from your computer into numbers that can then be pasted into the 3D model's customization settings to print.
I made this page to do two things well: generate the numbers cleanly and make the workflow convenient.
A typical process is to say a word such as "home" into a waveform maker, save the waveform image, upload it here, copy the generated numbers, paste them into the variable, and export the finished model.
But don't worry, join me and we'll take it one slide at a time!
Create Waveform Photo
You have three options to create the waveform:
- `Video` is the first option where you convert a video to a waveform (most common). This is mainly used if you have a past video (that has audio) you want to use.
- `Audio` is the second option where you convert an audio to a waveform. This is mainly used for higher quality sound.
- "Record" is the third option where you make your own recording on the website and use it. This is by far the most convenient that still produces a good waveform. If you wish for this option then skip to the "Record" tab.
Video and Audio To Waveform
Video to Waveform
- Take or find a video of someone saying the word or words. If it is a longer video, crop it so that it only contains the word or words you want when played.
- Send the video to your computer. If you have Apple, then congrats it's already on there.
- Open MP4 to MP3 Converter, upload the video, convert it to MP3, and save it.
- Open Waveform Generator, upload your MP3 audio file, and adjust it as needed. You can mess around in the settings, but make sure the waveform and background are only black and white.
- Ensure the waveform lines are clear:
◦ Download as PNG and crop it, or
◦ Take a screenshot and use AI to clean it up (often the easiest and best method)
Save the final image to your computer.
Note: Your computer's built-in camera app will work just fine.
Audio to Waveform
- Take or find an audio of someone saying the word or words. If it is a longer audio, crop it so that it only contains the word or words you want when played.
- Send the audio to your computer. It should be an M4A file.
- Open M4A to MP3 Converter, upload the video, convert it to MP3, and save it.
- Open Waveform Generator, upload your MP3 audio file, and adjust it as needed. You can mess around in the settings, but make sure the waveform and background are only black and white.
- Ensure the waveform lines are clear:
◦ Download as PNG and crop it, or
◦ Take a screenshot and use AI to clean it up (often the easiest and best method)
Save the final image to your computer.
Note: Apple devices include an app called "Voice Memos" and Android devices offer similar apps for free recording audio.
AI Prompts
These prompts work in Gemini, ChatGPT, and Grok. I tested them on all three.
- `Remove dashed line` removes the dashed line across the image.
- `Threshold to binary black and white` increases contrast and cleans up the image.
Record Audio
Record audio directly from your microphone, then convert it to a waveform visualization. Select "Record," pause briefly, say your word or words, pause again, then select "Stop."
Ready to record
Time: 0.00s
Live waveform visualization of your recording.
Capture Photo
Click `Choose File` below and make sure the preview matches your desired upload.
This preview shows the file before it is converted.
Custom Frame
Use these controls to add a black outer frame design around the scanned waveform. The preview updates live as you change the settings.
Scan your upload first, then tune the outer design here.
Copy Numbers
Copy the output with the button or manually. These numbers include both the waveform and the added frame design.
This preview shows the exact black-and-white design described by the output numbers.
Numbers through Customize to 3MF
- Open `Customize` on the `Waveform Wall Art` model on MakerWorld. You should already be there.
- Find the pod at the bottom of the customization section under `Pixel Data.` Delete the numbers already there, and paste your numbers into it.
- Adjust the rest of the settings to your liking. This can get a bit complex, so take your time and experiment as needed.
- Once you are satisfied, download the file to your computer as a 3MF.
Tip: If you want the piece larger than your printer's build plate, split the model into sections in your slicer, print each section separately, and glue them together afterward.
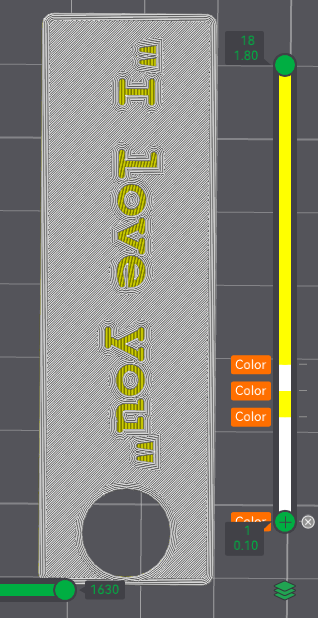
Add Colors Through Bambu Studio
Coloring Instructions
- Open the 3MF file in your slicer and slice it.
- To make the file two colors:
- Right-click Layer 1 on the layer slider.
- Select Change filament to and pick your first color.
- Move the top slider to the layer where you want the color change.
- Right-click that layer and select a different color.
- Slice it again, and you're ready to print!
Engraving Instructions
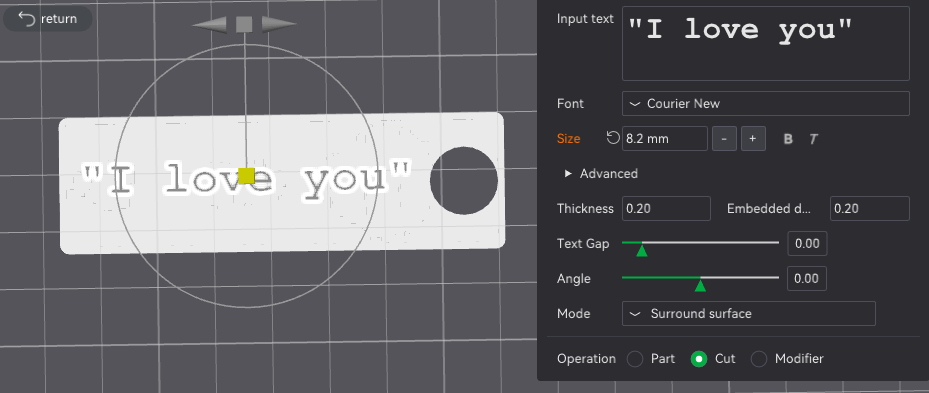
Furthermore, you can engrave text onto the back of your creation, which is especially useful for keychains. This can be done using the Text feature in Bambu Studio.
- Select your model and rotate it so the back side is visible.
- Use the Text feature to enter your desired words. Adjust the size and width as needed so the text fits properly.
- Set the Thickness to 0.2 and the Embedded Depth to 0.2. Then, change the operation type to Cut.
- Slice the model and you're ready to print!
Congratulations!
You have now finished the presentation! I am aware this may be a tricky process for some and easy peasy for others. But I believe the end result is worth it. Who doesn't love a good challenging and unique print? It's all the more rewarding.
If you have ANY questions/concerns feel free to post in the comments or direct message me. I would LOVE to help!
Sincerely,
Josiah Howell
Frequently Asked Questions
What image formats do you support?
We support PNG, JPG, JPEG, and GIF formats. For best results, use PNG with a transparent background or pure black and white images.
Why is my waveform image not converting properly?
Ensure your image is strictly black and white with high contrast. Use the threshold slider to adjust sensitivity. You can also clean up the image using AI tools before uploading.
How do I record audio properly?
Click "Record," wait a second to let the microphone settle, speak your word or words clearly, wait another second, then click "Stop." Speak in a normal voice at a consistent distance from your microphone.
What do the frame options do?
Flat: No frame around the waveform. Border: A simple rectangular border. Outline: A decorative frame with customizable depth and intensity. Use Frame Spacing to adjust gaps between waveform lines.
Where do I paste the generated numbers?
Copy the numbers from this tool and paste them into your 3D model's customization settings in the variable field. Check your 3D model documentation for the exact variable name.
Can I change the colors of my print?
Absolutely! The "Colors" tab in this tool lets you customize the waveform color and background color. You can preview the colors before exporting your model.